


I did see Mark Miller's post on backup lights http://www.transomtalk.com/index.php?threads/back-up-lighting-install.78948/#post-681631 But felt it was a little bit too technical and you don't have to spend that much money.
You do however need (or it sure helps) at least a 25ft fish wire (its on a spool available at any big box store, Harbor freight, etc). Not all fish wires are the same. Some use hooks, some enclosed loops, some have S loops. I've got all 3 so different situations one of them is handy. Next you will need lights. I prefer the LED units. Again, not all are the same. I have some that are 10 diodes, some 18 and even some that are 22 diodes. First set I ever got (last year or so) was 22 diodes and got a pair for $34. Can't find them now. But I did get a pair of 18 diode models for $54. They are bracket/grommet mounts (they don't come with either - but its only an additional $10 for a pair if you look good on ebay).
Want to show how I did it and what pitfalls to look for so you're prepared. 1st off, let me say I HATE cheapie trailer wire clips that slice through the insulation to make a connection as well as T Taps that does the same thing. I know BlueWaterLED uses those things for their trailer kits - but I toss them in the trash. I use heat shrink butt connectors. They have a sealer in them, provides strength (when done properly) and they won't corrode. T Taps/Quick taps of any kind tend to allow corrosion because vast majority of people don't use dielectric grease when they should. I personally don't like soldering. But I DO like adding heat shrink tubing OVER the heat shrink butt connectors. Ok so that's out of the way.
Next you need to decide WHERE you're gonna mount the reverse lights. On my tracker I went with Bracket/Grommet mounts. I mounted the brackets to my Tracker's rear bunk guide posts using stainless steel self tapping hex screws.


Here's what I was looking at as far as running the wire in my trailer frame on my 2013 Tracker.

You can see those NASTY T Taps Tracker uses for connections but the important part here is - look towards the back on the right and left, you'll see wires going through a hole.

On my trailer, same thing again at the tail light end, hole in plate so means I CAN'T run my wire snake all the way through. But I didn't let that deter me. I sized up my objective and decided to run a pair of blue and white wires including another white wire (different gauge wire so I could tell what was going to the reverse lights). I pushed my fish tape wire through from the bow end starting it to the starboard side. Once it reached the other end, I had to come up with a solution on how to fish my fish wire end out and through that hole at the tail light end. Solution was, a cut piece of coat hanger wire making a loop on one end so it would be easy to rotate it and on the other end and L shaped hook. I just kept fishing until I caught the end of the fish wire and pulled it on through.
I then put on the 2 white wires (remember one will end up be a pull wire for future projects if needed) and a blue wire. One blue and white wire was 16ga, other white wire is 14ga (its the future pull wire). Repeat the process for the port side. I adjust my wire for the length I want it, leaving 4 feet outside the tongue area. This wire IS tinned marine wire I got from EZACDC.com., its who I buy all my marine wire from. I then measure to cut as I lay it out to route to make it clean looking.
Here's a pic of heat shrink butt connections with shrink tubing over them. Wire isn't finished at this point, just making connections.

Here's what it looks like finished, routed and in split loom and zip tied. I couldn't find my black zip ties, so used white for now.

Now before you go and start hooking it all up at the harness end, you want to CHECK and see if the lights work so far. Here's my method for doing that. I'm using a 12v battery with test leads clamped to both blue wires for positive and both white 16ga wires for negative connections.

My result is this.

So now we can continue with the trailer plug harness. Here's my wires coming out of the tongue area. You can also see the CRAPPY wiring BPS does on their trailers. It should NEVER be like this for a swing tongue as your wires WILL at some point get pinched. Its not a matter will it - IT will sooner or later if its not fixed - I will show later how I fixed that.

So next I had to figure out how MUCH of the 4 pin connector I wanted to cut off as my new flat 5 pin connector has 36 inches of wire except for blue which was 18in or something like that. On my trailer, the white wire not only is grounded to the swing away frame, it also goes to each lamp on my trailer ensuring I get ground. So I had to incorporate that into my new harness connection (because I wanted it to). I also put a vinyl sleeve on my new flat 5 pin for 2 reasons, it looks good plus it gives it protection. Oh another pic of the factory wiring, plus my 4 white wires, 2 blue. It'll look different later.

Now for a pic of the flat 5 pin connector with the vinyl sleeve installed. I cut off all the T tapes and reconnected with heat shrink butt connectors.

Now remember how that swing arm area looked before. Here's how it looks now.

So now here's some of the pitfalls YOU MUST CHECK to insure your reverse lights work as you expected. First check your tow vehicles fuse box and insure ALL FUSES for trailer are there and are not blown. My Chevrolet Silverado did NOT have a fuse in the reverse slot. My Toyota Tundra DID but they still didn't work. Discovered that on a junction plate where the 7pin round connects to, I have 3 wire harness from the truck plugging into it. One was stop/tail, 2 for turn and another for reverse. The reverse harness had come loose from that junction plate, so it was just a matter of plugging it in till it clicked. NOW it works.
Final pic of the work.

Yes, I did install LED tail/brake lights while I was at it
 . Reverse light output pic

I've already changed out the 4 in marker lamps as well to LED. Later this week I'll be changing out the fender marker lamps to LED as well as the ID lamp assembly on the rear. That will require me to again unmount the brake/tail lights so I can remove the T taps. Before I take off the old ID lamp assembly, I'll connect wires to it so I can use those wires to connect the new ID LED lamp assembly with heat shrink butt connectors. If it needs split conduit tubing, that would be a good time to do it to prevent any rubbing by any metal edge.
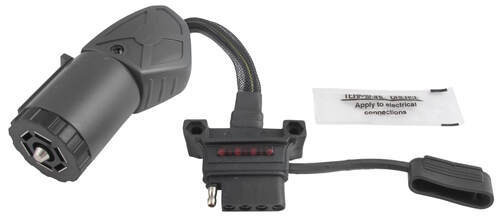
The assumption is made that you have a 7 pin round. You would need a 7 pin round to 5 pin flat adaptor like this. Hopkins Endurance Flex Trailer Connector Adapter w/ LED Circuit Tester - 7-Pole to 4-Pole or 5-Pole Hopkins Wiring HM47390
and in some situations with cable routing, you could also use these types of clamps instead of zip ties

You do however need (or it sure helps) at least a 25ft fish wire (its on a spool available at any big box store, Harbor freight, etc). Not all fish wires are the same. Some use hooks, some enclosed loops, some have S loops. I've got all 3 so different situations one of them is handy. Next you will need lights. I prefer the LED units. Again, not all are the same. I have some that are 10 diodes, some 18 and even some that are 22 diodes. First set I ever got (last year or so) was 22 diodes and got a pair for $34. Can't find them now. But I did get a pair of 18 diode models for $54. They are bracket/grommet mounts (they don't come with either - but its only an additional $10 for a pair if you look good on ebay).
Want to show how I did it and what pitfalls to look for so you're prepared. 1st off, let me say I HATE cheapie trailer wire clips that slice through the insulation to make a connection as well as T Taps that does the same thing. I know BlueWaterLED uses those things for their trailer kits - but I toss them in the trash. I use heat shrink butt connectors. They have a sealer in them, provides strength (when done properly) and they won't corrode. T Taps/Quick taps of any kind tend to allow corrosion because vast majority of people don't use dielectric grease when they should. I personally don't like soldering. But I DO like adding heat shrink tubing OVER the heat shrink butt connectors. Ok so that's out of the way.
Next you need to decide WHERE you're gonna mount the reverse lights. On my tracker I went with Bracket/Grommet mounts. I mounted the brackets to my Tracker's rear bunk guide posts using stainless steel self tapping hex screws.
Here's what I was looking at as far as running the wire in my trailer frame on my 2013 Tracker.
You can see those NASTY T Taps Tracker uses for connections but the important part here is - look towards the back on the right and left, you'll see wires going through a hole.
On my trailer, same thing again at the tail light end, hole in plate so means I CAN'T run my wire snake all the way through. But I didn't let that deter me. I sized up my objective and decided to run a pair of blue and white wires including another white wire (different gauge wire so I could tell what was going to the reverse lights). I pushed my fish tape wire through from the bow end starting it to the starboard side. Once it reached the other end, I had to come up with a solution on how to fish my fish wire end out and through that hole at the tail light end. Solution was, a cut piece of coat hanger wire making a loop on one end so it would be easy to rotate it and on the other end and L shaped hook. I just kept fishing until I caught the end of the fish wire and pulled it on through.
I then put on the 2 white wires (remember one will end up be a pull wire for future projects if needed) and a blue wire. One blue and white wire was 16ga, other white wire is 14ga (its the future pull wire). Repeat the process for the port side. I adjust my wire for the length I want it, leaving 4 feet outside the tongue area. This wire IS tinned marine wire I got from EZACDC.com., its who I buy all my marine wire from. I then measure to cut as I lay it out to route to make it clean looking.
Here's a pic of heat shrink butt connections with shrink tubing over them. Wire isn't finished at this point, just making connections.
Here's what it looks like finished, routed and in split loom and zip tied. I couldn't find my black zip ties, so used white for now.
Now before you go and start hooking it all up at the harness end, you want to CHECK and see if the lights work so far. Here's my method for doing that. I'm using a 12v battery with test leads clamped to both blue wires for positive and both white 16ga wires for negative connections.
My result is this.
So now we can continue with the trailer plug harness. Here's my wires coming out of the tongue area. You can also see the CRAPPY wiring BPS does on their trailers. It should NEVER be like this for a swing tongue as your wires WILL at some point get pinched. Its not a matter will it - IT will sooner or later if its not fixed - I will show later how I fixed that.
So next I had to figure out how MUCH of the 4 pin connector I wanted to cut off as my new flat 5 pin connector has 36 inches of wire except for blue which was 18in or something like that. On my trailer, the white wire not only is grounded to the swing away frame, it also goes to each lamp on my trailer ensuring I get ground. So I had to incorporate that into my new harness connection (because I wanted it to). I also put a vinyl sleeve on my new flat 5 pin for 2 reasons, it looks good plus it gives it protection. Oh another pic of the factory wiring, plus my 4 white wires, 2 blue. It'll look different later.
Now for a pic of the flat 5 pin connector with the vinyl sleeve installed. I cut off all the T tapes and reconnected with heat shrink butt connectors.
Now remember how that swing arm area looked before. Here's how it looks now.
So now here's some of the pitfalls YOU MUST CHECK to insure your reverse lights work as you expected. First check your tow vehicles fuse box and insure ALL FUSES for trailer are there and are not blown. My Chevrolet Silverado did NOT have a fuse in the reverse slot. My Toyota Tundra DID but they still didn't work. Discovered that on a junction plate where the 7pin round connects to, I have 3 wire harness from the truck plugging into it. One was stop/tail, 2 for turn and another for reverse. The reverse harness had come loose from that junction plate, so it was just a matter of plugging it in till it clicked. NOW it works.
Final pic of the work.
Yes, I did install LED tail/brake lights while I was at it
I've already changed out the 4 in marker lamps as well to LED. Later this week I'll be changing out the fender marker lamps to LED as well as the ID lamp assembly on the rear. That will require me to again unmount the brake/tail lights so I can remove the T taps. Before I take off the old ID lamp assembly, I'll connect wires to it so I can use those wires to connect the new ID LED lamp assembly with heat shrink butt connectors. If it needs split conduit tubing, that would be a good time to do it to prevent any rubbing by any metal edge.
The assumption is made that you have a 7 pin round. You would need a 7 pin round to 5 pin flat adaptor like this. Hopkins Endurance Flex Trailer Connector Adapter w/ LED Circuit Tester - 7-Pole to 4-Pole or 5-Pole Hopkins Wiring HM47390
and in some situations with cable routing, you could also use these types of clamps instead of zip ties
")